Sunday, 1 July 2018

Gas emergency? Don't panic just follow these steps.

Can you can smell gas? 

or

could you be suffering from the effects of carbon monoxide? (feeling ill - nausea? headaches? dizziness?)

Here's the steps you need to take:


  • 1. Call the National Gas Emergency number 0800 111 999 (England/Wales/Scotland).
  • 2. Get to fresh air immediately - open all doors and windows to ventilate the area.
  • 3. Turn off the gas supply if it is safe to do so at the emergency control valve at the meter unless the meter is located in a basement/cellar or at the LPG bulk tank or storage vessels.
  • 4. Do not turn the gas supply on again until it has been checked by a Gas Safe registered engineer.
  • 5. Do not operate electrical switches (this includes turning switches on or off). Operating electrical equipment can ignite escaping gas.
  • 6. Extinguish all naked flames and do not smoke.
  • 7. If you are feeling unwell visit your GP or hospital immediately and inform them that you may have been exposed to carbon monoxide.
  • 8. If the attending emergency operative identifies any concern with any gas appliances, follow the advice given concerning use of the equipment and where advised contact a Gas Safe registered engineer to fix the appliance and check for safety.

Initially your gas supply may be capped off by the emergency operative and you will be issued with a certificate outlining the reasons for the action taken. You will then need to contact a Gas Safe engineer who can fix the problem and ensure everything is safe before re-instating the gas.


Wednesday, 23 May 2018

Don't get ripped off! How much should you actually pay to get your toilet fixed?

During my years as a plumber I've had lots of my customers telling me how much they paid for previous plumbing work (with a different plumbing company). Of course customers never tell me they feel they didn't pay enough for a job! Sometimes customers tell me because they want me to quote a lower price. Lots of customers are afraid of getting ripped off. All too often customers have been ripped off!

Working out a price can be quite tricky for some jobs. Jobs can at times take longer than expected or require addition parts. I'll give you an example: a customer calls me up and asks for a quote to replace a syphon in their close-coupled toilet because it's not flushing properly. Now, at first this may seem a pretty straightforward, fairly quick fix which just requires one new part (the syphon). In fact there have been times (although not many!) where I didn't even need to replace the syphon, as it was one of those that can be repaired in about ten minutes without dismantling the whole toilet - in these instances I am honest with the customer and they save some money. On the otherhand, I could arrive at the property and the job isn't quite as straightforward. Usually there is a one-piece syphon fitted which means the toilet needs taking apart. This can then be followed by a number of difficult scenarios:
  • can't isolate the water as stop tap is broken
  • the toilet cistern is siliconed (or even worse 'no more nails' has been used) to the wall
  • the backnuts which hold the cistern to the pan are totally rusted (usually the case unfortunately) and won't undo

When I do eventually get the cistern apart I always replace the metal backplate and also the donut washer.

Image result for toilet siliconed to wall
cistern siliconed to the wall is a common site

Related image
rusty backnuts can be awkward to remove


I apologise if this sounds like I'm moaning. All I'm trying to do is make you aware. Sometimes jobs can be more difficult than they first appear, take longer than anticipated, and require extra parts.

As a plumber you have to take the rough with the smooth. Sometimes jobs go like a dream others turn into a nightmare (bit of an exaggeration!). On my website I list prices for different jobs and I try my best to be honest and fair with customers. At the end of the day I want repeat customers and the best advertisement is through recommendations.

If your toilet needs attention, I do a special toilet overhaul offer at sjeplumbingderby.com/special-offers

If you need other plumbing or gas work doing, make sure you check out my rates at sjeplumbingderby.com/prices


Sunday, 18 February 2018

Why is water coming from my overflow?


There are different types of overflow that you may potentially find in your home. I will go through each one in turn.

1. Overflow from your toilet cistern


One of the main reasons water is coming out of your overflow pipe is because a ball valve or fill valve has failed to cut the water off in your toilet cistern. If the valve fails then the water feed will continue to fill up the cistern. To prevent the water in the cistern overflowing and damaging your property the overflow pipe carries the excess water away and terminates outside your home.

These days most toilets incorporate an internal overflow. So, instead of a separate pipe carrying excess water away, it drains directly into the toilet bowl. You can of course have your flush valve replaced to update your toilet so it has an internal overflow. The internal overflow is a great innovation as it does away with the extra overflow pipework and is also more reliable (overflow pipework can leak and still cause damage to your property).

2. Overflow from your cold water header tank.


If your hot water is supplied by means of a hot water cylinder (usually in the airing cupboard) then you will have a header tank (often in the loft) that keeps your cylinder topped up with fresh water. This will also have a ball valve or fill valve (just like your toilet). If this valve fails then the excess water will be carried away by an overflow pipe and terminate outside your home.

3. Overflow from your central heating feed and expansion tank. 


If you have what is known as an open-vented central heating system then you will have a small feed and expansion tank (usually in your loft). This tank (much smaller than the tank that feeds your hot water cylinder) is used to top up the water in your central heating system (radiators), and also to allow for expansion as the water heats up (that's why it's called a 'feed and expansion' tank!). Just like your toilet and header tank it will have a fill valve (usually a brass ball valve) and of course an overflow to carry away excess water.

4.  Overflow from a combination boiler (pressure relief valve)


If you have a combi boiler then it will have what is known as a pressure relief valve. If your system builds up to much pressure then this relief valve will open and allow water to escape through a pipe and terminate safely outside your property (this escaping water could be hot so needs to terminate in a location that could not scald someone). Pressure relief pipework will be made from copper. Sometimes your pressure relief valve might start 'letting by' resulting in a drip from your external pressure relief pipe. If this is the case, you will notice that your boiler loses pressure and needs topping up on a regular basis.

What can I do to stop my overflow leaking?

In the case of a toilet, header or feed and expansion tanks, the best thing to do in order to stop your overflow pipe leaking is to hire a plumber to fit a new ball or fill valve. Some plumbers will change the washer only. It depends on the individual plumber on what he thinks is the best course of action.


Never Just block the overflow up as all that will happen is the water will fill straight to the top of the tank and then pour through your ceiling. If you are finding it difficult to contact a plumber, then either turn off the mains water stopcock and open all the taps up in the house. This will stop the tank from continuing to fill up and will drain down the level of the water in the tank, to a safe height. 


In the case of water coming from your boiler pressure relief valve you will need a Gas Safe registered plumber. It may be that your pressure relief valve needs replacing if it is just letting by. However, if your central heating system pressure is too high, then this will need further investigation. Don't forget, a pressure relief valve is a safety device to protect you and your property. So make sure you get it sorted.


Friday, 2 February 2018

Where's my stopcock? Don't leave it until it's too late!


You never know when you might get a leak. If you spot a leak you will need to act fast to minimise water damage. Initially you might not know the cause of the leak. For example, it might be a mains water leak; or a leak from your central heating system; or a leak from a waste water pipe. So, your first port of call should be to turn off your mains water at the stopcock until you can assess the situation. 


When I visit homes to do plumbing work I am amazed at how many people don't know the whereabouts of their stopcock. In some instances the customer knows where it is but it is very awkward to access (boxed in or buried under lots of stuff!). I had one a few weeks back where I just could not access the stopcock at all because the kitchen fitter had put new units in the way.

Then there's the other problem. You know the location of the stopcock and it is easily accessible, and you think great. But you go to turn it off and it just doesn't turn as it's jammed, or it turns but doesn't totally shut the water off.

If for any reason you can't turn your stopcock off, you will need to locate the external stopcock (usually under a small metal grid on the pavement in front of your house). These can be a real pain to locate and to turn off - but I'll keep that for a future blog! Anyway, in an emergency you hardly want to start scrabbling about trying to turn the water off in the street!


I remember getting a call at 8pm during that really cold winter back in 2010. An elderly chap said he had water coming through his upstairs ceiling. First thing I told him was to turn his stopcock off. I was at his house well within an hour. Unfortunately, he hadn't been able to locate his stopcock and subsequently the water had caused a huge amount of damage in quite a short time - as well as now being ankle deep in water, it had also got into the electrics and fused everything! So first thing was to isolate the water in the street, then make sure all the electrics were isolated, before finding that the leak was due to a burst pipe in the loft. I fixed the burst, located the internal stopcock (under the kitchen unit plinth!) and then called his daughter. There was no way he would be able to stay in a saturated house, with no heating (I seem to remember it was -5 degrees outside!) and no electricity.

I always remember this incident because I think of how much damage could have been avoided (or at least minimised) if he had been able to turn the water off quickly.

MY TOP TIPS
  • locate your stopcock and make sure it is easily accessible.
  • test your stopcock every six months to make sure it works. Remember: Clockwise is Closed.
  • attach a label to your stopcock with the telephone number of an emergency plumber.
IF YOU GET A LEAK
  1. Turn off your mains water at the stopcock.
  2. If you know for sure it is a mains water leak, then open all your taps (hot and cold) to drain down the system.
  3. Call an emergency plumber.

Most importantly, and this is my main point: don't wait until you have an emergency!


Thursday, 25 January 2018

LEVER or BUTTON - that is the question


More new toilets than ever come with a push button flush rather than a lever. Some people do still prefer a lever flush, but I think many would agree that a push button flush is easier to operate.

LEVER or PUSH BUTTON?

Image result for lever toilet flush                     Image result for push button toilet flush

What many people don't realise is that they can convert their existing toilet from lever flush to push button (or button to lever if that is what you prefer!).

The reason lever flushes fail or become difficult to operate is down to the syphon inside the cistern - if the diaphragm washer splits then it can take several attempts before you get a successful flush (very frustrating and potentially embarrassing especially if it's not in your own home and you can't flush!).

To fix your flush problem you can of course change the diaphragm washer (only a piece of thin plastic) very easily if you have a multi piece syphon (as below) which comes apart. If you haven't got a washer then you can just make your own by cutting one out of something like a rubble sack.
Image result for multi piece syphon
you can undo the nut and take this syphon apart to renew the diaphragm


Image result for syphon diaphragm washer

a syphon diaphragm washer


Unfortunately if you have a one piece syphon (as below) then you will need to remove the whole syphon from the cistern to get to the washer.

Image result for multi piece syphon 
a one-piece syphon which will need to be removed to replace the diaphragm washer

If the syphon has to be removed then you can go one of two ways:

1) replace the washer or syphon and keep the lever flush
or
   2) replace the syphon with a drop valve with push button flush

Image result for drop valve
drop valve with push button flush


While we're at it I often recommend to clients that it is worth replacing the fill valve at the same time (makes good sense whilst the water is off and the cistern is drained). That is why I offer customers a great deal of replacing all the internal parts of your toilet cistern for just £80. At least then you have peace of mind in the knowledge that your toilet won't let you down. Check out this great offer on my website www.sjeplumbingderby.com

Wednesday, 1 November 2017

Too much choice? Advice on choosing kitchen taps.

The kitchen tap is used on average 10 times more every day than the bathroom tap. Choosing the right tap is very important. Here's some guidance to help you.

Question 1 - Do you have one tap hole or two tap holes in your kitchen sink?


If you have one tap hole then you will need to get a mono-mixer tap.

 If you have two tap holes in your sink then you can choose between a pair of pillar taps or a deck-mixer.


Question 2 - Do you want rubber washered (full turn) taps or ceramic disc (quarter turn) taps?

If you have particularly low water pressure then I would go for traditional rubber washered taps. The rubber washer can also be easily and cheaply replaced if your tap starts to drip in the future.

Ceramic disc taps are easier to turn on and off (just quarter of a turn for on and off) so are ideal for the elderly or those with arthritis. The ceramic discs are maintenance free; so if they do start to drip then the whole tap gland needs replacing which is of course more expensive than just replacing a rubber washer and it can sometimes be difficult to source the correct size gland for your tap.

Most manufacturers these days use ceramic glands in their taps, so you will have a greater choice of these than the rubber washer types.

Question 3 - How much do you want to spend?

Remember your kitchen tap is going to get lots of use. In the long run it isn't always economical to get the cheapest taps. There are lots of cheap imports these days (as with everything I suppose!) and you can get a cheap pair of pillar taps for less than £20. You will get a few years out of them before they start to drip, or the spindle gets worn, or the plastic heads split. In which case it's usually just a case of binning them and buying some new ones.

Personally, I always recommend getting a well known, quality brand like Bristan. Their taps are made in the UK (based in Tamworth) and come with a 5 year guarantee. Even if your taps fail after the five years you can give them a call and get the required spare part sent out to you. In the past I have managed to get spare parts for Bristan taps that were over 10 years old. Their advisors are very helpful.

Remember, if your taps are unbranded and made in a factory thousands of miles away the chances are you won't be able to get the required spare part. So although the cheaper taps also come with a guarantee it is difficult to see how this can be honoured.

and finally........
make sure you choose taps that are suitable for your water system. If you have very low pressure (usually your hot tap) then some mono-mixers may not give you a decent flow - so check before you buy!

....and just remember, if you decide to change your own taps, the most difficult part is getting the old ones off! That's where your plumber comes in!


Tuesday, 10 October 2017

why it's worth paying to get a proper outside tap fitted

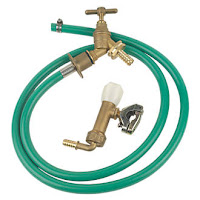
You can get outside tap installation kits aimed at the DIY'er for around £15 like the one below:

Although they seem initially cheap, I believe they are a false economy.

Firstly, they use a self-cutting screw to tap into your existing pipework. Believe me these have a tendency to leak. I have been out to a couple of customers this year where a good seal was not achieved and resulted in a leak. Trouble is, you need a nice straight, perfectly round piece of pipe, and then to get the sealing gasket on nice and square. Unfortunately, if you don't get a good seal first time then you might end up cutting out a piece of pipe and replacing it.

Secondly, a hose clip is used to attach the flexible pipe to the valve. I certainly don't like the idea of relying on a hose clip in my home to protect me from a potential flood.

Thirdly, in my opinion these kits are not a long term solution. Eventually you will probably end up replacing it. If you are lucky it might very well last you for years, but you have to remember these kits are made as cheaply as possible. I have replaced a few over the years.

So do yourself a favour and get a proper outside tap fitted. When I fit an outside tap I use copper and brass pipework and fittings, and a lever operated isolation valve with a separate double-check valve. An installation that will give you peace of mind and last for a long time.