Friday 19 October 2018

Double-check valves. What are they and do I need one?

We are very fortunate in this country that we can turn on our stopcock and expect good quality water that can be drunk straight from the kitchen tap. We pay water companies for this privilege so that's what we should expect.

However, once the water is in our home it is our responsibility. If the supplied potable water is polluted or contaminated after it enters our property then it is not the responsibility of the water companies.

How can potable water become contaminated once it enters our property? Surely it runs in sealed pipes right?

Water flows into our homes in one direction. However, sometimes due to pressure changes in the pipework it can actually flow backwards. This backwards flowing water could potentially be contaminated.

Where could backflow happen in my home? 

Let's say you've got an outside tap with a hose attached and you're watering the garden or maybe cleaning the car. You decide you need a break and to use the toilet. You put the hose down and leave it running in a bucket or in a puddle outside. You then go into the house to use the toilet. You flush the toilet. You then turn the basin taps on to wash your hands. As the pressure is now diverted through the pipes to your toilet cistern and to your basin taps it can pull water back up your garden hose and into your mains water supply. The water that is drawn back in could potentially be contaminated (especially if you have one of those attachments that contain fertilizer or maybe even car shampoo on the end of your hose).

Can backflow happen anywhere else in the home?

Fortunately washing machines and dishwasher have inbuilt backflow prevention. Taps in the home have an air gap (space between the tap outlet and any possible contaminated water). Valves such as those in your toilet or tank also have air gaps or inbuilt backflow prevention.

One potential danger of backflow is if you have a shower attachment on your bath taps. If you use the shower head whilst having a bath and then let it drop into the bath water, contaminated bath water could backflow into your mains water supply. Some proper showers (not like the attachments below) have backflow devices built in whilst most also have a bracket on the riser rail which will prevent the shower head falling into the bath.

using a shower attachment whilst having a bath is a potential cause of backflow

How do I prevent backflow from my garden tap?

You need a DOUBLE-CHECK VALVE. This allows water to flow in one direction (to your tap) by forcing a spring open inside the valve. However, if water tries to flow in the opposite direction (back into your home) the spring closes preventing this from happening.

a typical double-check valve (arrow shows flow direction)

The DOUBLE-CHECK valve must be fitted on the pipework running to your tap before it goes outside. You may be aware that some outside taps incorporate a built in double-check valve within the tap body. However, on new installations these are no longer allowed (Water Regulations) as they can freeze in winter, jam up and become ineffective. I have seen this happen a few times where homeowners try to use their outside tap for the first time after winter but find that no water comes out at all. Basically the double-check valve has seized in the closed position (they can also seize in the open position). So the valve should be protected from frost by installing it within the fabric of the  property.

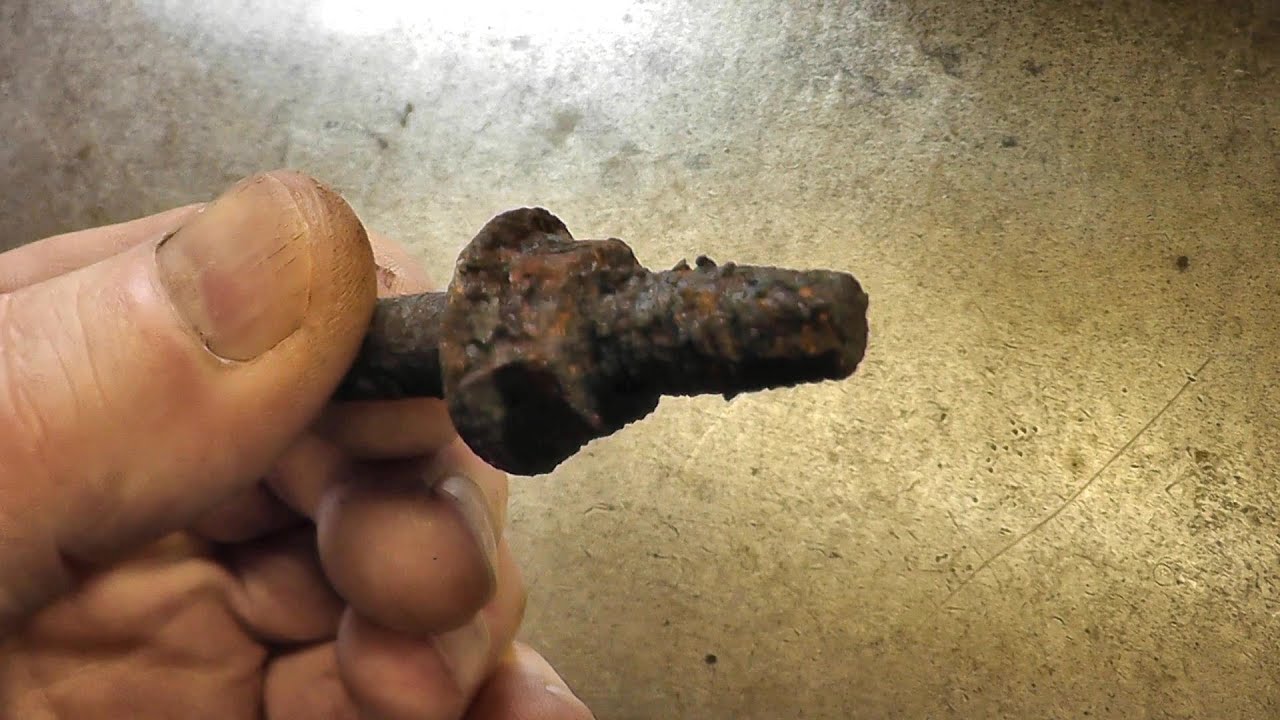
double-check valve damaged by frost


If you get a new outside tap fitted make sure it in installed with a separate double-check valve inside your property. And don't forget, it is an important safety device to protect you and your family.

For more advice on outside taps, please refer to my previous post https://sjeplumbingas.blogspot.com/2017/10/why-its-worth-paying-to-get-proper.html


Sunday 5 August 2018

Do I need a plumber or electrician to replace my electric shower?

So your electric shower has packed up. Who do you call to replace it? Plumber or electrician?

I'll be upfront with you from the start. As you know, I am a plumber, so I'm writing this from a plumber's point of view. However, I will try my best to give you some good balanced advice.


Do the electrics need to be altered in any way?

If it is a straight swap where no alterations are needed to the existing electrics then a plumber can do the work. By 'no alterations' we mean that the electrics feeding the shower don't need extending, upgrading or changing. If they do then you need to get a qualified electrician in.

Part P (Building Regulations) below states that if any additions or alterations are made to an electrical circuit in a bathroom then the work is notifiable:


Make sure you buy a replacement shower that is suitable

A word of warning before you go out and buy a replacement shower. Make sure you know the KW rating of your old shower. If your existing shower is 8.5kw then I would recommend replacing it with another 8.5kw model. If your existing shower is 8.5kw then it may be that you have 6mm electrical cable supplying it. Anything over 8.5kw should in most circumstances have 10mm cable. By choosing a shower of equal rating you should also avoid having to upgrade your fuse at your consumer unit.

What if I can't get an identical replacement or I want a different model?

Companies like Mira and Triton have made it as easy as possible to replace an existing shower without having to alter the electrics or water supply. Models like the Triton Fast-Fit and Mira Multi Fit have adaptable and multiple cable and pipe entry points. The manufacturer websites also give plenty of guidance as to which new models are suitable to replace existing models.
https://www.tritonshowers.co.uk/showers
https://www.mirashowers.co.uk/showers/electric-showers/


Do I need an RCD fitted?

A Residual Current Device (RCD) is a safety device that switches off electricity automatically if there is an electrical fault. As an RCD is much more sensitive than a normal fuse or circuit breaker it cuts off the electricity supply much quicker. It therefore provides additional protection against electrical shock.

Although it is not a legal requirement to install an RCD on an existing shower circuit, I do strongly advise my customers to get one fitted by an electrician. It gives you that extra safety and peace of mind.

to conclude...…..

if you just want a replacement shower in the same location as the old one, then a plumber who is competent with electrics is good for the job. On the other hand, an electrician who is competent to do the plumbing can also do the job. Having said that, I have known a few electricians over the years and most of them want nothing to do with plumbing work.

Although I am not a qualified electrician, I do know how to carry out the basic electrical tests and checks required. If there is any doubt in my mind about the safety of the electrical side of the installation then I get a qualified electrician in to check it out and make any amendments necessary. It most definitely is not worth taking risks where water and electricity are concerned.

Tuesday 24 July 2018

How to diagnose your toilet leak like a proper plumber.

You've just noticed a puddle of water next to your toilet. A puddle left by the poor aim of the male members of the household maybe! You wipe it up. You pop back about an hour later and there it is again in exactly the same spot. Must be a leak you think. You rummage in the kitchen cupboard and find an old margarine tub. You place this where the water appeared. You monitor the water level in the tub over the next couple of days whilst contemplating what action to take next. It's not much of a leak after all. Not even worth calling a plumber. Can't actually tell where it's coming from.

What makes identifying a leak on a toilet difficult?


The trouble with toilets is that they have lots of curves and a nice smooth finish. Any small leak can trickle down from above, follow the contours of the pan, and leave a puddle which is no where near the actual leak itself.

I remember a few years back going out to fix a leaking toilet. It was in November and we were just having the first really cold winter weather. Customer showed me the toilet and sure enough it was pretty wet around the base of the toilet. The chap said it seemed to be worse after the toilet had been flushed and especially in the morning. I dried everything off and checked everything on the toilet. I couldn't for the life of me find where it was leaking from. To cut a long (and frustrating) story short in the end it was simply down to condensation. Due to the sudden cold snap the heating had been put up to max and the bathroom was nice and warm. However, each time the toilet was flushed, the cistern was refilling with icy cold mains water. This interaction between the warm and cold was creating heavy condensation on the outside of the cistern and this was trickling down the toilet and pooling on the floor below. Of course this was at its worst in the morning when the water was at its coldest and the heating at its highest. There are ways to reduce condensation forming on toilet cisterns but I'll leave that for a future blog. Lets concentrate on leaks.

Ask yourself some simple questions to help you figure out where the leak is from?


1. Does your toilet leak even when it's not being used?
If your toilet leaks water even when it has just been sitting there without being used (flushed that is) the most likely source of the leak is from the fill valve/ball valve. Either:


  • from the union between the valve and the cistern. If there is a dribble from where the valve enters the cistern then it usually just needs the backnut tightening up. You will need to take the cistern lid off and hold the valve while you tighten the nut to ensure the valve doesn't turn as you tighten it. Take care not to overtighten as these backnuts are plastic and can split. 
valve backnut

  • from the union between the valve and the incoming water supply. Again it may just need the nut tightening up. More often than not though it will need a new washer (fibre or rubber depending on union type). Just be careful you don't cross-thread when you tighten it back up (believe me this is very easy to do, and any plumber that denies ever cross threading a toilet valve is probably telling porkies!)
isolation valve with fibre washer that fits directly on to the bottom of the toilet valve


Before I go any further I should mention that before you attempt to do any repairs: 
MAKE SURE YOU ISOLATE THE WATER TO YOUR TOILET and EMPTY THE WATER FROM THE CISTERN BY FLUSHING IT (or use a syphon if it can't be flushed). Also have some rags handy to catch any drips.


2. Does your toilet only leak when you flush it?
If a pool of water only appears after you have flushed then there are a few possibilities.
  • leaks from the pan connector (the plastic pipe that connects the back of your toilet to the main waste pipe). If it leaks from here it is often because the toilet pan is not properly fixed to the floor. What this means is that every time someone sits on the toilet the pan moves slightly and eventually the seal on the pan connector can work its way loose. I've seen all sorts of attempted repairs on these usually involving lots of silicone, but unfortunately most don't cure the problem (and just look a horrible mess!). Remember, this will be dirty toilet water that is leaking. The best solution is to replace the pan connector and make sure the pan is securely fixed to the floor. If you can't avoid some movement (sometimes a problem with toilets on wooden floors) then you may be best off using a flexible pan connector which will allow for this slight movement without it leaking.


pan connector


  • leaks from the donut washer (yes the dreaded donut washer!). If you have a fairly new toilet and it leaks only when you flush then it could be that your donut washer is out of line. The donut washer creates a seal between the cistern and the pan. They can be a right pain in the **** because if they don't create a proper seal you will get water dripping down every time you flush. If you need to replace the donut washer (make sure you get the right size) just take extra care when lowering the cistern onto the pan that everything is lined up and the washer hasn't slipped out of place.


  • If your toilet is not a close coupled one then you don't have to worry about donut washers but you may have a flush cone instead. You will find these on low-level and concealed cistern toilets and they create a seal where the flush pipe enters the pan. I find the black rubber ones (below) create a much better seal than the cheaper clear plastic ones.

and finally...…
what I have mentioned here are the most common toilet leaks I have come across over the years. There are always other possibilities of course. Like the toilet pan I once went to that had a hairline crack in it (believe me that took me a while to figure out!). Don't even get me started on back to wall and concealed cisterns! I must admit when it comes to toilets, keeping it simple is always best in my eyes.

Remember to also check out my other 'toilet' themed blogs:


If you live in Derby (or near by) and have a leaking toilet and don't fancy the challenge of fixing it yourself then get in touch. Contact me by phone or email.

Also check out my prices and special 'toilet overhaul offer' on my website.

Friday 13 July 2018

Carbon Monoxide alarms - questions and answers

IMPORTANT NOTE:
The instructions that come with your CO alarm should always be read and followed. The advice given here is general advice.

Question 1. 
Do you put CO alarms high or low?

Answer
CO is slightly lighter than air and  has a tendency to rise to the highest points in a room. Therefore CO alarms should ideally be placed high up on a wall (above the height of a window or door). CO alarms can be fitted on the ceiling and usually need to be at least 300mm from the wall. 

Question 2.
Should I have my CO alarm next to my gas appliance?

Answer
Ideally your CO alarm should be between 1 and 3 meters horizontally away from your appliance.

Question 3.
How many CO alarms should I have?

Answer
Ideally you need a CO alarm in every room that has a fuel burning appliance. Also rooms where you spend lots of time. Having a CO alarm in bedrooms or near to where everyone sleeps is also highly recommended as this is when we are most vulnerable.

Question 4.
Are there any locations that I should avoid placing my CO alarm?

Answer
Yes. Avoid placing your CO alarm:
  • in enclosed spaces such as in a cupboard or behind curtains
  • where it can be obstructed such as behind furniture
  • above a sink or close to a cooking appliance
  • next to a door or a window or a vent
  • next to an extractor fan
  • where there may be extremes of temperature
  • in an dirty or dusty areas 
  • in a damp or humid location such as a bathroom
  • right next to your fuel burning appliance (less than 1 meter).
other advice:
If your alarm does sound then don't think it is just a false alarm and ignore it. Remember: CO is invisible and not easily detected (which is why it is often called the silent killer).
Make sure you test your CO alarm on a regular basis (usually by pressing the test button).

REMEMBER: when installing a CO alarm always thoroughly read, understand and follow the manufacturers instructions.

Tuesday 10 July 2018

How just £15 could save your life.


Would you spend £15 to protect you and your family in your own home? I'm guessing that most people would answer 'yes' to this question. Yet, I am amazed at how few people have a carbon monoxide alarm fitted in their home. When I service or repair a customer's gas appliance I usually ask them if they have a CO alarm fitted. More often than not the answer is 'no'. Some say they were 'thinking of getting one but just haven't got round to it.'. I have even had customers who are totally unaware of the risks of CO poisoning.

Image result for carbon monoxide alarm
a typical CO alarm
Avoidable deaths
The Office for National Statistics says that over 50 people die each year from CO poisoning, and around 4000 are treated in hospital. Yet it is estimated that 27 million in the UK don't have a CO alarm fitted.

CO alarms are a second line of defence
It is important to note that CO alarms are a good second line of defence. CO alarms only alert you when something is already wrong (i.e. a fault with your gas appliance).

Your first line of defence should always be to keep your gas appliances regularly serviced (at least once a year) by a Gas Safe engineer.

Awareness is key to saving lives and reducing deaths and incidents of CO poisoning. It is important that people are aware of the symptoms (refer to my previous Blog) and tell tale signs (refer to my previous Blog).

I always recommend getting a CO alarm to my customers and am happy to supply them with one.
Protect yourself and your family by following the ABC checklist:

  • A - ALARM (do you have one fitted?)
  • B - BATTERIES (have you tested it and are the batteries working?)
  • C - CHECK (have you had an up to date gas check?)
At the end of the day it is about peace of mind, and £15 is not a high price to pay for that!

Get your gas appliances serviced by giving me a call today. And why not ask about getting a CO alarm fitted at the same time. 


Find out more about carbon monoxide by visiting www.co-bealarmed.co.uk/  or the Gas Safe website

Friday 6 July 2018

What are the warning signs of having carbon monoxide in your home?

The warning signs of a CO leak

Any of the following could be a sign of CO in your home:

  • Flames of a lazy yellow or orange colour on your gas hob, rather than being a crisp blue

    Image result for carbon monoxide gas hob

  • Dark staining on/around appliances;

    Related image

  • Pilot lights that frequently blow out;

    Image result for pilot light boiler

  • Increased condensation inside windows.

    Image result for carbon monoxide condensation windows


Faulty appliances in your home can lead to CO poisoning. 

TWO pieces of advice:

1. Get your gas appliances regularly serviced by a Gas Safe registered engineer.

2. Get a Carbon Monoxide alarm fitted.


Wednesday 4 July 2018

Are you suffering from the effects of Carbon Monoxide?

Unsafe gas appliances can produce a highly poisonous gas called carbon monoxide (CO). It can cause death as well as serious long term health problems such as brain damage.

What are the symptoms of CO poisoning?

CO symptoms are similar to those of flu, food poisoning, viral infections and fatigue. That’s why it’s quite common for people to mistake this very dangerous poisoning for something else.

Other signs that could point to CO poisoning:

  • Your symptoms only occur when you are at home and seem to disappear when you leave home.
  • Others in your household (including pets) are experiencing similar symptoms and they appear at a similar time. 


What to do if you suspect CO poisoning

  • Get fresh air immediately. Open doors and windows, turn off gas appliances and leave the house.
  • See your doctor immediately or go to hospital - let them know that you suspect CO poisoning. They can do a blood or breath test to check. 
  • If you think there is an immediate danger, call the Gas Emergency Helpline on 0800 111 999.
  • Ask a Gas Safe registered engineer to inspect your gas appliances to see if there is a dangerous problem.

Sunday 1 July 2018

Gas emergency? Don't panic just follow these steps.

Can you can smell gas? 

or

could you be suffering from the effects of carbon monoxide? (feeling ill - nausea? headaches? dizziness?)

Here's the steps you need to take:


  • 1. Call the National Gas Emergency number 0800 111 999 (England/Wales/Scotland).
  • 2. Get to fresh air immediately - open all doors and windows to ventilate the area.
  • 3. Turn off the gas supply if it is safe to do so at the emergency control valve at the meter unless the meter is located in a basement/cellar or at the LPG bulk tank or storage vessels.
  • 4. Do not turn the gas supply on again until it has been checked by a Gas Safe registered engineer.
  • 5. Do not operate electrical switches (this includes turning switches on or off). Operating electrical equipment can ignite escaping gas.
  • 6. Extinguish all naked flames and do not smoke.
  • 7. If you are feeling unwell visit your GP or hospital immediately and inform them that you may have been exposed to carbon monoxide.
  • 8. If the attending emergency operative identifies any concern with any gas appliances, follow the advice given concerning use of the equipment and where advised contact a Gas Safe registered engineer to fix the appliance and check for safety.

Initially your gas supply may be capped off by the emergency operative and you will be issued with a certificate outlining the reasons for the action taken. You will then need to contact a Gas Safe engineer who can fix the problem and ensure everything is safe before re-instating the gas.


Wednesday 23 May 2018

Don't get ripped off! How much should you actually pay to get your toilet fixed?

During my years as a plumber I've had lots of my customers telling me how much they paid for previous plumbing work (with a different plumbing company). Of course customers never tell me they feel they didn't pay enough for a job! Sometimes customers tell me because they want me to quote a lower price. Lots of customers are afraid of getting ripped off. All too often customers have been ripped off!

Working out a price can be quite tricky for some jobs. Jobs can at times take longer than expected or require addition parts. I'll give you an example: a customer calls me up and asks for a quote to replace a syphon in their close-coupled toilet because it's not flushing properly. Now, at first this may seem a pretty straightforward, fairly quick fix which just requires one new part (the syphon). In fact there have been times (although not many!) where I didn't even need to replace the syphon, as it was one of those that can be repaired in about ten minutes without dismantling the whole toilet - in these instances I am honest with the customer and they save some money. On the otherhand, I could arrive at the property and the job isn't quite as straightforward. Usually there is a one-piece syphon fitted which means the toilet needs taking apart. This can then be followed by a number of difficult scenarios:
  • can't isolate the water as stop tap is broken
  • the toilet cistern is siliconed (or even worse 'no more nails' has been used) to the wall
  • the backnuts which hold the cistern to the pan are totally rusted (usually the case unfortunately) and won't undo

When I do eventually get the cistern apart I always replace the metal backplate and also the donut washer.

Image result for toilet siliconed to wall
cistern siliconed to the wall is a common site

Related image
rusty backnuts can be awkward to remove


I apologise if this sounds like I'm moaning. All I'm trying to do is make you aware. Sometimes jobs can be more difficult than they first appear, take longer than anticipated, and require extra parts.

As a plumber you have to take the rough with the smooth. Sometimes jobs go like a dream others turn into a nightmare (bit of an exaggeration!). On my website I list prices for different jobs and I try my best to be honest and fair with customers. At the end of the day I want repeat customers and the best advertisement is through recommendations.

If your toilet needs attention, I do a special toilet overhaul offer at sjeplumbingderby.com/special-offers

If you need other plumbing or gas work doing, make sure you check out my rates at sjeplumbingderby.com/prices


Sunday 18 February 2018

Why is water coming from my overflow?


There are different types of overflow that you may potentially find in your home. I will go through each one in turn.

1. Overflow from your toilet cistern


One of the main reasons water is coming out of your overflow pipe is because a ball valve or fill valve has failed to cut the water off in your toilet cistern. If the valve fails then the water feed will continue to fill up the cistern. To prevent the water in the cistern overflowing and damaging your property the overflow pipe carries the excess water away and terminates outside your home.

These days most toilets incorporate an internal overflow. So, instead of a separate pipe carrying excess water away, it drains directly into the toilet bowl. You can of course have your flush valve replaced to update your toilet so it has an internal overflow. The internal overflow is a great innovation as it does away with the extra overflow pipework and is also more reliable (overflow pipework can leak and still cause damage to your property).

2. Overflow from your cold water header tank.


If your hot water is supplied by means of a hot water cylinder (usually in the airing cupboard) then you will have a header tank (often in the loft) that keeps your cylinder topped up with fresh water. This will also have a ball valve or fill valve (just like your toilet). If this valve fails then the excess water will be carried away by an overflow pipe and terminate outside your home.

3. Overflow from your central heating feed and expansion tank. 


If you have what is known as an open-vented central heating system then you will have a small feed and expansion tank (usually in your loft). This tank (much smaller than the tank that feeds your hot water cylinder) is used to top up the water in your central heating system (radiators), and also to allow for expansion as the water heats up (that's why it's called a 'feed and expansion' tank!). Just like your toilet and header tank it will have a fill valve (usually a brass ball valve) and of course an overflow to carry away excess water.

4.  Overflow from a combination boiler (pressure relief valve)


If you have a combi boiler then it will have what is known as a pressure relief valve. If your system builds up to much pressure then this relief valve will open and allow water to escape through a pipe and terminate safely outside your property (this escaping water could be hot so needs to terminate in a location that could not scald someone). Pressure relief pipework will be made from copper. Sometimes your pressure relief valve might start 'letting by' resulting in a drip from your external pressure relief pipe. If this is the case, you will notice that your boiler loses pressure and needs topping up on a regular basis.

What can I do to stop my overflow leaking?

In the case of a toilet, header or feed and expansion tanks, the best thing to do in order to stop your overflow pipe leaking is to hire a plumber to fit a new ball or fill valve. Some plumbers will change the washer only. It depends on the individual plumber on what he thinks is the best course of action.


Never Just block the overflow up as all that will happen is the water will fill straight to the top of the tank and then pour through your ceiling. If you are finding it difficult to contact a plumber, then either turn off the mains water stopcock and open all the taps up in the house. This will stop the tank from continuing to fill up and will drain down the level of the water in the tank, to a safe height. 


In the case of water coming from your boiler pressure relief valve you will need a Gas Safe registered plumber. It may be that your pressure relief valve needs replacing if it is just letting by. However, if your central heating system pressure is too high, then this will need further investigation. Don't forget, a pressure relief valve is a safety device to protect you and your property. So make sure you get it sorted.


Friday 2 February 2018

Where's my stopcock? Don't leave it until it's too late!


You never know when you might get a leak. If you spot a leak you will need to act fast to minimise water damage. Initially you might not know the cause of the leak. For example, it might be a mains water leak; or a leak from your central heating system; or a leak from a waste water pipe. So, your first port of call should be to turn off your mains water at the stopcock until you can assess the situation. 


When I visit homes to do plumbing work I am amazed at how many people don't know the whereabouts of their stopcock. In some instances the customer knows where it is but it is very awkward to access (boxed in or buried under lots of stuff!). I had one a few weeks back where I just could not access the stopcock at all because the kitchen fitter had put new units in the way.

Then there's the other problem. You know the location of the stopcock and it is easily accessible, and you think great. But you go to turn it off and it just doesn't turn as it's jammed, or it turns but doesn't totally shut the water off.

If for any reason you can't turn your stopcock off, you will need to locate the external stopcock (usually under a small metal grid on the pavement in front of your house). These can be a real pain to locate and to turn off - but I'll keep that for a future blog! Anyway, in an emergency you hardly want to start scrabbling about trying to turn the water off in the street!


I remember getting a call at 8pm during that really cold winter back in 2010. An elderly chap said he had water coming through his upstairs ceiling. First thing I told him was to turn his stopcock off. I was at his house well within an hour. Unfortunately, he hadn't been able to locate his stopcock and subsequently the water had caused a huge amount of damage in quite a short time - as well as now being ankle deep in water, it had also got into the electrics and fused everything! So first thing was to isolate the water in the street, then make sure all the electrics were isolated, before finding that the leak was due to a burst pipe in the loft. I fixed the burst, located the internal stopcock (under the kitchen unit plinth!) and then called his daughter. There was no way he would be able to stay in a saturated house, with no heating (I seem to remember it was -5 degrees outside!) and no electricity.

I always remember this incident because I think of how much damage could have been avoided (or at least minimised) if he had been able to turn the water off quickly.

MY TOP TIPS
  • locate your stopcock and make sure it is easily accessible.
  • test your stopcock every six months to make sure it works. Remember: Clockwise is Closed.
  • attach a label to your stopcock with the telephone number of an emergency plumber.
IF YOU GET A LEAK
  1. Turn off your mains water at the stopcock.
  2. If you know for sure it is a mains water leak, then open all your taps (hot and cold) to drain down the system.
  3. Call an emergency plumber.

Most importantly, and this is my main point: don't wait until you have an emergency!